If you thought that my last post about skiing outfits was totally out of the blue and coincidental, it wasn't!
You see, one week ago, Debi at My Happy Sewing Place posted about a special pattern sale at Retromonkey's shop on Etsy. The offer was 25% off to all her readers on gorgeous vintage patterns.
Needless to say, I scooted on over there and searched through all the lovely patterns Mary Beth is offering.
I had been looking for a good pattern for winter apparel for a really long time. I one time saw a pattern from 1935 on some website I now cannot remember. It was kind of a pattern Wiki and the pattern was "currently unavailable".
When surfin' Retromonkeys I spotted a pattern that nearly made me P my pants!!!
Oh yes! It was indeed the same incredible pattern I had seen!
The price was perhaps a bit more than what I usually spend when pattern shopping, but this was not just any pattern. Firstly, it is 78 years old and has made it through a war, and who knows what else. And secondly, it's still in factory folds. Thirdly, I got 25% off, and that helped a lot :)
And now, it will live in my ever growing pattern collection forever!
Mary Beth at Retromonkeys left me a lovely heartwarming handwritten Thank you-note along with the pattern. I love that! She is obviously a professional and caring seller, and I will definitely spend some more in her shop.
Now, I need to start searching for the perfect fabric. Woolen fabrics are notoriously expensive in Norway, but I managed to find a shop that seems to have good quality wools at reasonable rates. It's named Skaar tekstil AS, for you Norwegian readers that is perhaps also looking for wool ;) And if somebody know of other options on quality woolens, please drop me a note in the comments!
Have you ever struck gold on your pattern searches? Doesn't it feel awesome!??
Saturday, 9 November 2013
Thursday, 7 November 2013
First flakes falling!
Well, there are of course places further north in our small, but long country, that has gotten snow several weeks ago, but that will not stop me from doing all sorts of happy-dancing!! I looooove snow!!!
For the time being, it is not much, and temps are just around freezing point, so granted, this snow will not last, but it certainly is proof that winter IS coming!
We have a saying here in Norway, that all Norwegians are born wearing skis (that will explain my childless state). So I cannot contain myself, and have decided to celebrate winters arrival and future skiing prospects, with some lovely, snowy vintage inspiration! First off, fabulous mid-century art deco posters. Don't you just love these?
![]() |
| source |
This gorgeous siren obviously loves her snow as much as me. Look, she hears cherubs!!!
I would too if I looked this fabulous when skiing!
(if you look closely, it's actually a little devil!)
![]() |
| source |
Speaking of looking fab, check out these spiffy ensembles from winter 1937-38 Montgomery Wards! If you fancy an interesting read, why don't you check out the history of womens sportswear as told by the Vintage Traveler, where this image was borrowed :)
![]() |
| source |
Fabulous skiing ensembles from the 1930s.
![]() |
| source |
I wouldn't mind having my picture taken by this dapper French skier either, me thinks ;)
This is ski sport pioneer, early aviator and inventor, Étienne Banau-Varilla, at the 1936 Winter Olympics.
I think his outfit is outta this world..... Invent me a time machine, Étienne ;)
![]() |
| source |
![]() |
| source |
For those of you still on the fence about the awesome Knit for Victory challenge hosted by Tasha at By Gum By Golly, how 'bout a spectacular skier sweater? I think I need one of these!
![]() |
| source |
I'll have this one! Gives me an excellent opportunity to wear my wood work goggles.....
Joking aside, this is a fantastic sweater.
![]() |
| source |
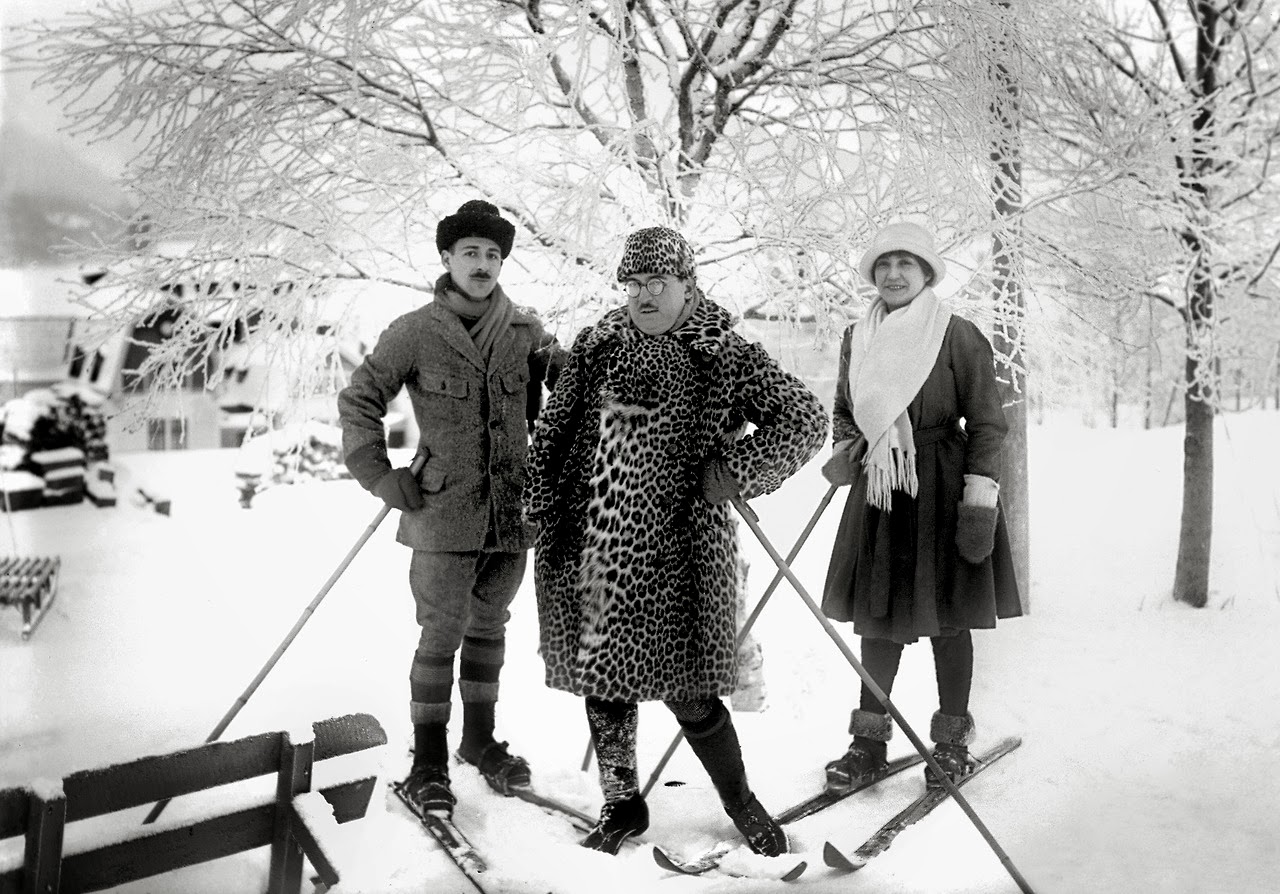
No ski-related post written by a Norwegian, would ever be complete without making fun of our neighbors, the Swedes. They clearly have no idea. This gender confused gentleman is stomping on the other folks skis, wearing a dead animal. My bet is; he's not there to ski, but to make a pass at Charlie Chaplin on the left there, later on at the afterski.
![]() |
| source |
Last inspiration pic doesn't have an ounce of snow in it, but who can resist Marilyn sand skiing in peep-toe sandals? Adorable...
So, how about you? Are you ready for winter yet? I say, bring it on!
Tuesday, 5 November 2013
Bow neck baby!

I just wanted to share a great little sew-along I found recently over at Seamstress Erin.
It is scheduled for November, and the theme is bow neck blouse!
Follow the link to see how to participate :)
I love pussy bow blouses, and have a couple of patterns, but have never quite gotten around to make any.
So needless to say, I'M IN!
It would be a nice easy project of instant gratification, after all the struggles I had with the Little Horror dress.
So, are YOU in??? Come on, and join the fun!
Sunday, 3 November 2013
Little dress of horrors...
And so it is finally done! The 1947 McCall #7000..
So cute and innocent looking, but a devil in disguise I tell you.
This was initially going to be my entry for the Fall For Cotton challenge, due to be finished on September the 30th. But then my life got in the way, not to mention the dress giving me a proper run for my money.
This dress is full of "first's" for me. There are bound buttonholes, which actually turned out pretty good, with the help of lovely Laura Mae's tutorial at Lilacs and Lace. As a side note on the buttons; I know I was supposed to use shanked ones, but I just couldn't find ANY that looked remotely suitable. On any occasion, finding the right buttons for a project is my nemesis....
In a moment of insanity, I decided to fully line the thing. Also a first, and since the pattern didn't call for it, it meant I had to draft the lining pieces for the bodice myself, AND figure out the construction.
I did all mistakes imaginable in that very process, and the further along I got, the more frustrating it became. For instance, I sewed the lining to the armholes early on, so it was easier to handle as one piece. Only to find that finishing the armholes on the inside was not going to happen the way I wanted it. I ended up bias binding the seams, afraid that it would be very bulky, but it was actually fine!
I also sewed the bodice- and skirt lining to the waist seam when joining the two together, and so ran into trouble when it was time for the lapped side zipper.... Oh yeah, hadn't done any of those before either!
The sleeves was also a major pain in the rear. First time around, I made sleeves according to the instructions, and constructed the cuffs before setting the sleeves. Apparently, baby corduroy stretches when being handled, and suddenly I had 4" of ease in the sleeve heads when they were ready to go on the bodice. There was just no way they would go smoothly into the armholes. So I had to make whole new sleeves.
I trimmed off about 1" of the sleeve heads for good measure, and finally got them onto the dress. Then I proceeded with the cuffs.
The remake of the sleeves turned out a good thing actually, as I was able to use contrast fabric inside the cuffs, for a more interesting look.
The zipper nearly stranded on the fact that I for some reason sewed the skirt together using less than 1/2" seam allowance. Don't ask why, I really have no idea. There was barely room to squeeze in the zipper on there, and I had to sew a strip of fabric onto the lapped side seam allowance. That gave me something to attach the zipper cord to, and in the end it was ok.....ish. My machine is not the best equipped when it comes to zipper feet, so it might have been less of a struggle if I had some proper feet. My lacking experience wasn't helping either.
On the positive note, the hemming went surprisingly well. I did an invisible hem by hand, and I am pleased with how it turned out. On the lining I lost my mind again obviously, and turned the hem to the wrong side, machine stitched it, got puckering and a general non-pro look. But at this point, I was just too fed up to even consider picking it, and re-doing. No. Way.
When I have put some distance between me and this creation, I am sure I will thank it for teaching me so much. My next lining attempts will be miles better, as will zippers, buttonholes, inside finishings, sleeve settings and fabric choices. I also learned alot about muslin fitting, so all in all, a gigantic learning experience!
I am really pleased not having this dress in a UFO pile somewhere.
I apologize for the oddly lit and sometimes blurry photos. Norway-land has really shitty weather these days, and has the light conditions of a cave. I plan to style myself when the sun comes out, to show you this beauty properly. It doesn't look like much on the hanger, but it's kind of rockin' "on-person" :)
So cute and innocent looking, but a devil in disguise I tell you.
| The pattern, McCall #7000, 1947. |
![]() |
| Behold!! (insert cherubs singing) |
This was initially going to be my entry for the Fall For Cotton challenge, due to be finished on September the 30th. But then my life got in the way, not to mention the dress giving me a proper run for my money.
This dress is full of "first's" for me. There are bound buttonholes, which actually turned out pretty good, with the help of lovely Laura Mae's tutorial at Lilacs and Lace. As a side note on the buttons; I know I was supposed to use shanked ones, but I just couldn't find ANY that looked remotely suitable. On any occasion, finding the right buttons for a project is my nemesis....
![]() |
| My first bound buttonholes :) They ARE the same size, I swear......! |
In a moment of insanity, I decided to fully line the thing. Also a first, and since the pattern didn't call for it, it meant I had to draft the lining pieces for the bodice myself, AND figure out the construction.
I also sewed the bodice- and skirt lining to the waist seam when joining the two together, and so ran into trouble when it was time for the lapped side zipper.... Oh yeah, hadn't done any of those before either!
![]() |
| Creative inside lining. |
The sleeves was also a major pain in the rear. First time around, I made sleeves according to the instructions, and constructed the cuffs before setting the sleeves. Apparently, baby corduroy stretches when being handled, and suddenly I had 4" of ease in the sleeve heads when they were ready to go on the bodice. There was just no way they would go smoothly into the armholes. So I had to make whole new sleeves.
I trimmed off about 1" of the sleeve heads for good measure, and finally got them onto the dress. Then I proceeded with the cuffs.
| Have you ever seen so much ease in your life? |
The remake of the sleeves turned out a good thing actually, as I was able to use contrast fabric inside the cuffs, for a more interesting look.
![]() |
| Cute little cuffs :) |
The zipper nearly stranded on the fact that I for some reason sewed the skirt together using less than 1/2" seam allowance. Don't ask why, I really have no idea. There was barely room to squeeze in the zipper on there, and I had to sew a strip of fabric onto the lapped side seam allowance. That gave me something to attach the zipper cord to, and in the end it was ok.....ish. My machine is not the best equipped when it comes to zipper feet, so it might have been less of a struggle if I had some proper feet. My lacking experience wasn't helping either.
On the positive note, the hemming went surprisingly well. I did an invisible hem by hand, and I am pleased with how it turned out. On the lining I lost my mind again obviously, and turned the hem to the wrong side, machine stitched it, got puckering and a general non-pro look. But at this point, I was just too fed up to even consider picking it, and re-doing. No. Way.
When I have put some distance between me and this creation, I am sure I will thank it for teaching me so much. My next lining attempts will be miles better, as will zippers, buttonholes, inside finishings, sleeve settings and fabric choices. I also learned alot about muslin fitting, so all in all, a gigantic learning experience!
I apologize for the oddly lit and sometimes blurry photos. Norway-land has really shitty weather these days, and has the light conditions of a cave. I plan to style myself when the sun comes out, to show you this beauty properly. It doesn't look like much on the hanger, but it's kind of rockin' "on-person" :)
![]() |
| Livingroom view, at noon. Gloomy... |
Saturday, 19 October 2013
Paging all nurses!
After a rather depressing weekend of UFO searching last week, I decided to admit myself into the Pinhouse FWYS-programme (Finish What You Start). Otherwise known as the Blogger Mental Hospital. Meaning I had to wrestle myself into picking 1 -one- item from a UFO-pile, and not touch anything else craft related until said item was finished.
Reason? I am a notorious non-finisher. I tend to throw myself at new projects with great enthusiasm, get it almost done, and then distract myself with something new and totally lose interest in what I was working on. This just has to stop! It is not very satisfying having nothing to show for all the time I do spend crafting, not to mention those pesky UFO's mocking me from every closet of my house.
SO! Cheered on by my lovely "nurses" on the previous post (you know who you are!),
I am now proud to say: I FINISHED SOMETHING! (Thanks, ladies)
This lovely knitted sweater is a project I started almost three years ago, and is from a Norwegian knitting book written by Tine Solheim, called "Maskeball". It was published in 2009, so not vintage, but the pattern is kind of retro with those traditional roses and the "fleas" all over. It is quite typical Norwegian, but with a twist, color wise.
The body is knit on the round, and the sleeves and collar knitted separately. The ribbing is made with a sort of cable technique, so it looks twisted. It is a lot more interesting than regular ribbing, but hellishly slow to knit!
I did struggle with setting in the sleeves, because of so much ease in the sleeve heads. But after some stitching and unpicking, I got a result I can live with. The sweater is rather fitted, so any wrinkle would be stretched out some, luckily.
The neckline is a bit special, and I think if I were to knit this again (which I most likely won't) I would lengthen the back piece just a little so that the collar would lie better. It sort of pulls to the back a little. I would also close the "border edge" at the shoulder a couple of inches, it gapes rather oddly now. Another thing I might change is the location of where ribbing ends. When I started this sweater, I had yet to learn about the natural waist. I find now, that things that hit the natural waist, looks so much better than things hitting the "modern" waist. The ribbing wants to find my waist (good luck...), and rides up, creating excess sweater around the waist, which is less flattering.
ANYWAYZZ! The whole idea with this exercise was to finish, and I am very relieved that I did. I felt really good to fasten the last thread, and folding a sweater (!) neatly together (instead of cramming a bunch of random pieces in a bag and hide them). It would be lying to claim I 100% enjoyed the process. It was hard to take it up again, I constantly laid it down and wandered towards the sewing machine. I tell you , that thing is like a drug, not to mention my fabric- and pattern stash.... But I was good.
All in all, I am happy with the sweater, and I think it is a nice usable piece for the upcoming winter!
Reason? I am a notorious non-finisher. I tend to throw myself at new projects with great enthusiasm, get it almost done, and then distract myself with something new and totally lose interest in what I was working on. This just has to stop! It is not very satisfying having nothing to show for all the time I do spend crafting, not to mention those pesky UFO's mocking me from every closet of my house.
SO! Cheered on by my lovely "nurses" on the previous post (you know who you are!),
I am now proud to say: I FINISHED SOMETHING! (Thanks, ladies)
![]() |
| My smug-face :) |
![]() |
| Ta-Dah!!! |
This lovely knitted sweater is a project I started almost three years ago, and is from a Norwegian knitting book written by Tine Solheim, called "Maskeball". It was published in 2009, so not vintage, but the pattern is kind of retro with those traditional roses and the "fleas" all over. It is quite typical Norwegian, but with a twist, color wise.
The body is knit on the round, and the sleeves and collar knitted separately. The ribbing is made with a sort of cable technique, so it looks twisted. It is a lot more interesting than regular ribbing, but hellishly slow to knit!
![]() |
| Twisted ribbing. Sloooooow :P |
I did struggle with setting in the sleeves, because of so much ease in the sleeve heads. But after some stitching and unpicking, I got a result I can live with. The sweater is rather fitted, so any wrinkle would be stretched out some, luckily.
![]() |
| My pressing technique needs attention :/ |
![]() |
| The "a bit too long"-bit. |
ANYWAYZZ! The whole idea with this exercise was to finish, and I am very relieved that I did. I felt really good to fasten the last thread, and folding a sweater (!) neatly together (instead of cramming a bunch of random pieces in a bag and hide them). It would be lying to claim I 100% enjoyed the process. It was hard to take it up again, I constantly laid it down and wandered towards the sewing machine. I tell you , that thing is like a drug, not to mention my fabric- and pattern stash.... But I was good.
All in all, I am happy with the sweater, and I think it is a nice usable piece for the upcoming winter!
Friday, 11 October 2013
Thoughts on bloggery, shortcomings and UFO's
Since I started this little blog in August, I've learned so much.
Blogging is actually quite a lot of work and planning, something I didn't give much thought at the time.
It is almost like running a little store, you want people to stop by, and having them come back. For that to happen, one need "groceries on the shelves" that people are interested in, and constantly offer something new.
I really like this aspect of it. It keeps me thinking and evaluating, and most of all it keeps me DOING.
My biggest personal shortcoming, must be my lacking ability to finish things I start. I have always been this way, and I have spent a good deal of time figuring out why! Why is it, that I am all fired up about a project and then lose all interest just before I am about to finish? Why do I not feel the urge to hold the said project in my hands, be proud of my effort, and love and cherish the item? Why do I choose for it to spend years in assorted UFO-piles, mocking and bugging me to no end? Am I a masochist?
I tend to be hard on myself, and being an anal nutbag about my own "performance". I am critical, and have a hard time thinking that what I do is good enough. Even if people tell me I am doing great, I still have this little voice telling me that there is room for improvement. If I have made something that has some kind of flaw, how ever small and unnoticeable, I tend to just focus on the dang flaw, instead of enjoying what I've made.
It kind of ruins the fun.
So I think this is what keeps me from finishing. If I don't finish, I don't have to make my mind up as to whether I am satisfied or not. I think it is rather sad. Because, lets face it, so what if the dress/sweater/painting isn't perfect? Will it kill me? I think not. But what about all those nagging UFO's?
Will they harm me? Actually, I think they will. They make me feel like a failure, more than that shirt with the backwards cuffs. And I don't want that.
So I have decided to use this blog as therapy :)
Having an audience, makes me feel I have someone backing me up. Someone that can help me overcome this need to be "perfect", but at the same time keep me going. All photos in these post were the result of a quick run around the house. All are UFO's of varying age, and all chime in the mocking choir. There are many more, but I just couldn't stand dragging them all out. You know, for my mental health and all :)
Since most of these are just missing some finishing touches and assembly, I am making an attempt to get them finished. Maybe not all, but certainly the sewing and knitting related ones.
Blogging is actually quite a lot of work and planning, something I didn't give much thought at the time.
It is almost like running a little store, you want people to stop by, and having them come back. For that to happen, one need "groceries on the shelves" that people are interested in, and constantly offer something new.
I really like this aspect of it. It keeps me thinking and evaluating, and most of all it keeps me DOING.
My biggest personal shortcoming, must be my lacking ability to finish things I start. I have always been this way, and I have spent a good deal of time figuring out why! Why is it, that I am all fired up about a project and then lose all interest just before I am about to finish? Why do I not feel the urge to hold the said project in my hands, be proud of my effort, and love and cherish the item? Why do I choose for it to spend years in assorted UFO-piles, mocking and bugging me to no end? Am I a masochist?
![]() |
| UFO chair seat. |
I tend to be hard on myself, and being an anal nutbag about my own "performance". I am critical, and have a hard time thinking that what I do is good enough. Even if people tell me I am doing great, I still have this little voice telling me that there is room for improvement. If I have made something that has some kind of flaw, how ever small and unnoticeable, I tend to just focus on the dang flaw, instead of enjoying what I've made.
It kind of ruins the fun.
![]() |
| UFO horse oil painting. |
So I think this is what keeps me from finishing. If I don't finish, I don't have to make my mind up as to whether I am satisfied or not. I think it is rather sad. Because, lets face it, so what if the dress/sweater/painting isn't perfect? Will it kill me? I think not. But what about all those nagging UFO's?
Will they harm me? Actually, I think they will. They make me feel like a failure, more than that shirt with the backwards cuffs. And I don't want that.
![]() |
| One of a gazillion UFO drawings. |
So I have decided to use this blog as therapy :)
Having an audience, makes me feel I have someone backing me up. Someone that can help me overcome this need to be "perfect", but at the same time keep me going. All photos in these post were the result of a quick run around the house. All are UFO's of varying age, and all chime in the mocking choir. There are many more, but I just couldn't stand dragging them all out. You know, for my mental health and all :)
![]() |
| The infamous FFC dress, most recent UFO. |
Since most of these are just missing some finishing touches and assembly, I am making an attempt to get them finished. Maybe not all, but certainly the sewing and knitting related ones.
Monday, 7 October 2013
Wearing History WWII Overalls
In an effort to share with you what I have made up until this point, I present to you my take on the Wearing History's WWII Overalls!

I sincerely apologize for the bad bandana, these photos were taken on a whim and I had a bad hairday, mkay? I obviously can't pose to save my life, either, so please just look at the pants :)
This is my second ever garment I've sewn, finished about 4 months ago.
When I decided to try this pattern, I was not quite sure if a high waisted style would suit me. I am still not sure if it is very flattering... I am not curvy at all, and have no bottom to fill out these trousers with, so it looks rather "empty". I added back pockets to the design, because without them, my behind looked like the face of the moon. Just a whole lotta flat nothing, so I felt I needed to break up the area with something. It helped some.
I am most happy with the buttons I found. I wanted a nautical twist on the pants, and what is better than anchor buttons??
![]() |
| O'hoi anchors :) |
The pattern was a down-loadable one, and just required some printing, cutting and taping. Piece of cake, really :) The instructions clearly stated to make a muslin, which I totally ignored. The overalls ending up wearable is no thanks to me, and I highly recommend to make a muslin as the crotch location is very different than on modern style pants. If I make these again, I will definitely put down some more effort in getting a better fit.
Instructions were very clear and easy to follow, but when it came to the side buttoning placket, I just fell off the wagon completely. I had to ask around for some hints, and ended up figuring it out eventually :)
It seemed there was an extra piece of facing, but I might be wrong. My overall still function without it, so obviously not a vital part. This pattern packet also contains pieces for a playsuit and regular trousers, so maybe the extra part belongs to one of the other garments?
Another thing, the pattern pieces for the bodice has dart lines marked with the same kind of lines as for cutting. So being a newb, I cut along the cutting lines, minding my own business. But when I went to sew the darts, I quickly found out that those lines were seam lines, and I had to cut new bodice pieces.
The button holes are all hand sewn, using white embroidery floss. I think they turned out quite nice, but the technique sure can do with some more practice.
All in all, I view these overalls as a learning experience. The pattern is great. They were lots of fun to make, and they are very comfy to wear, but I feel they are kind of not flattering to my figure. Before I made them, I was inspired by other gals making them, all very curvy and feminine, and on those booties the trousers look awesome!!!
Maybe I should make a bum pad :P
Hah..!
Have you ever made something that did nothing for your figure?
Subscribe to:
Posts (Atom)