Saturday, 21 December 2013

Blocking a knitted garment

Hello everybody, are you all en route with your Christmas preparations? 
I sure hope so, and I am sure many of you agree it is quite the race! 

My holiday has officially started, I had my last day at work this year on Wednesday. And if I am honest, I don't know how I would get done with all my shopping and preparations if it wasn't for those two extra days off. It also meant I was able to finish my Knit for Victory cardigan!! Yay!


I cast on November 21st, and I never thought it would be finished this fast! But the pattern was very straight forward, and I had very few problems along the way. Don't you just love it when things run smoothly?
I did however have the nagging feeling of knitting a child size cardigan, the pieces just looked SO small, and there was really no way to tell how it would turn out. Other than knitting the darn thing finished, naturally :)

I knew I had to block it, and having never done it before, it was an exciting new experience! 

So here's how I did it:


You'll need bucket, water, detergent, tape measure, towel, pins, cushion and knitted wool string :)
(a bottle of wine is useful too.)


I first finished all my pieces (obviously), and washed them how I would the finished cardi. I soaked the pieces in lukewarm water, using a mild detergent especially for wool. My yarn is 100% new wool. I was careful not to rub or wring it, I just gently swooshed it around in the water and squeezed what water I could from it with my hands. 


Rock and roll :)


Then, I placed the piece on a clean dry towel, rolled it up into a sausage, and stepped on it a few times. Yes, people, I did, just to get the towel to absorb the water. It works like a charm, and the pieces come out nice and flat and just the right amount of damp :)


Take care with the edges!  If you get scallops like these,
it may help using more pins, and just work the shape til it's even.


Next step is to stretch the piece to the right size and shape. My pattern had an illustration with measurements, so I just got out my tape measure, took some measurements of my own body for comparison and started pinning the piece onto my blocking surface. I used a garden couch seat cushion, but any pinable smooth surface will do. Just be careful your yarn will not bleed any color onto your pinning surface, it can do that when wet. I used large upholstery pins, but I am sure regular pins are just as useful. If they are without heads, pinning them at an angle away from your piece will keep it from slipping off.


Much better even edge.


Stretch and pin the piece into the shape and size you want, but make sure any edges are nice and even. When wet the piece is springy, but once dry it will hold the shape it dried into, so if you don't care for scalloped edges, do spend some extra moments getting it all even.
Also, make sure to match the length of the sides where front pieces and back piece meet, and also the shoulder area, so that sewing together goes smoothly.

Not too shabby:)


Just to give an idea on just how much larger you can make your pieces (Thank Gawd!!), here's my sleeves pre and post blocking! WOW!!


From straight jacket to wearable in a couple of hours :)


When your happy with the result, leave to dry :) Repeat with all pieces.
Now all's left is to weave in all those loose ends, and assemble your garment (which I have), so stay tuned ;)

In the meantime, don't forget to relax a bit and enjoy the Christmas spirit!
Merry Holidays to you all ;)


Friday, 13 December 2013

Knit-along coming along!

So the last few weeks have been quite busy over here in Norway-land.
Work is crazy, a lot of last minute scramblin' before the holidays, so when I finally get home from the factory and stable chores, I just want to pass out on the couch.

But there has been crafting! Oh yes!
Today is exactly three weeks since starting my Knit For Victory cardigan, using a vintage pattern from 1940.
It is free online on the Victoria and Albert Museum website, and is called 'A new design in cable stitch'.
And I must say it has been smooth sailings all the way! I have knitted some in the past, but mostly small things, like socks, mittens and hats. Oh yeah, and the Snowroses sweater :)
Here's my progress so far.


Back piece, not yet cast off because I wanted to coordinate
the armhole and the shoulder sloping to the fronts.


The fronts.
One of which I knitted one and a half time.... Forgot some decrease stitches at the armhole there.
Whoopsie.

Two thirds of a sleeve,
one and one third to go!!


This is my first cable knit, but it is really easy. All you need is an extra needle (a little wonky one for cabling) and the ability to count to eight, because you only do cabling (in this case) on every eighth row. Simple! I am "memory challenged", so I bought some markers to help me keep count, but so far I have only used one, for where I started the increases on the sleeve.

If anything, the hard part is getting the cables to look good near edges. For example, on the fronts I noticed after casting off, that the decrease rows on the shoulder was right on where a cable should happen, so it doesn't look right. If I don't fix it, I know it will bug the crap out of me, so there will have to be some frogging. But it is just a small piece at the top, so no biggie.

Damn.
There should be cabling... could be worse though :)


There are some similar issues on the arms. Because of the increase stitches happening on either side, there will be new cables appearing, and at some point they will be wide enough to get "twisted" like the others. Until they are, they are just flat stripes of knit stitches and look odd. But since they will end up on the underside of the arm, I can live with it.

I did knit a swatch before I cast on, and had the right gauge.
But I did so in Stockinette, and I am so worried it will end up too small. I added extra stitches to the back piece and fronts (about the equivalent of 1 inch, so around 3" in total). All that is left now is one and a half sleeve, but for some reason I totally forgot to check the measurements on the sleeve sketch in the pattern, and did not add any extra stitches either! Gulp.

What can I say....I was eager. So praying they won't end up Arm-Strangulators. Heh..

Like mentioned before, at this point I think it mostly resemble a cabled straight jacket, so I will obviously be blocking the beejeezuz out of it. I am actually very curious on that process, because I have never blocked any knitting in my life, so I don't have any idea on just how much it is possible to block. Interesting!

But that's a tale for another post! Onwards!!


Saturday, 30 November 2013

Knit....purl.....knit.....purl

For those of you that might have missed me, I am still here!
Entangled in yarn!
You see, winter time in Norway is definitely knitting time for me, and after a few years of not knitting a stitch I am now wielding my needles like a crazy person!


source


The very talented Tasha, at By Gum By Golly, is hosting an awesome 40s knit-along these days, and the timing was perfect for me. The last weeks I have been kind of hoarding knitting patterns from just the 1940s, so the only conundrum left, was to choose ONE pattern. It's like telling a child to only choose ONE piece of candy in the candy store.....gah.


Anyways, I landed on a pattern called "A new design in cable stitch" and it is free from the Victoria and Albert Museum website. I see a couple of other knitters in the knit-along are using the same pattern, so obviously a tried and tested pattern. Besides, it feels safe to have the opportunity to nag other people, in the event of getting stuck. Hah!


So here's my progress so far, the back is done, and the left front nearly there. It is looking quite good for my first attempt at cabling. It really is rather easy, luckily.

The pattern states it is for a 37" bust, but it is alarmingly small at this stage. I know it will be blocked, but you know, your feelings are a bit split when the thing looks like a cabled straight jacket. I even knit a swatch, AND threw in some extra stitches for good measure. 40s sweaters tend to be on the close fitting side (the painted-on-look) so I am in suspense here! It will be fine, I'm sure (happy-thoughts!!!)...

Sewing wise, it has been a tad quiet, but I have an ongoing project from my sewing list, no less!
A petrol wool skirt, and I am trying out interlining this time. Also a first time attempt, and it is looking ok so far (although there has been slipping and cursing involved).
Here's a teaser:


The color on both the yarn and the wool fabric on these pictures, are not true. They are more teal-ish, and the avid reader will notice that I AM COLOR COORDINATING!!! (that's a first...)
Oh yes, I used my brain when shopping, and that deserves a glass of wine imho!

Have a lovely weekend, all!


Sunday, 17 November 2013

The birdcage blouse!

I really got my blouse sewing mojo on lately!
Just as well, as I am seriously lacking separates in my closet.
So here's my latest make; The Birdcage Blouse!!


It is made from the Wearing History Smooth sailing blouse pattern, a 30s style blouse.
It has short puffed sleeves, with turn up, bias cut cuffs, a large pointy notched collar, a fitted, yoked bodice with tucks in the back. Gathering on shoulders and on the back, and small front pockets (that I totally forgot to install!)

The fabric is 100% cotton, also a remnant I found for cheap. I just can't resist a good novelty print, and this was just too cute to pass up. It is birdcages on powder pink, with different colored birds in them, and cute little hearts scattered around. Some of the birds are neon colored, but that doesn't show in the pictures.
I wanted to persuade my two budgies to pose in the pictures with me, but they were not having it, so here's just me..


I am sorry for the semi blurry photos, I really struggle getting good photos alone with my tripod and remote as we have crappy lighting indoors, but you get the general idea.


This blouse was easy and quick to make, and I really like the style. It is perfect for casual wear, and novelty prints. I read some reviews on the pattern in advance, and some said that the sleeves was tight, so I just cut them the next size up from the size I was using. No problem!
As a matter of fact, this is the first thing I have made that didn't involve any seam-ripping, what so ever! What??! Can it really be?
I guess it means I am coming along... :)


I suspect more of these blouses in the near future! Such a great pattern, and fit.


Have you tried any of the Wearing History patterns?
What did you think of them?


Wednesday, 13 November 2013

Meow!


Hello good people!

I am back, with my newest make!
For your viewing pleasure is a pussy bow blouse made from Simplicity #8738, printed in 1978.
The fabric is a light cotton I found in a remnant bin for about 1£, and it was just enough to squeeze out this cute blouse.

The pattern is one I got in a small lot off a Facebook group, for a couple of £s earlier this summer, and when I saw there was going to be a Bow Neck Sewalong hosted by Seamstress Erin, well... I was good to go!

The pattern was VERY tatty... I had to totally restore it, before it could be put to use. If someone told me it was cut by Stevie Wonder, I would not bat an eyelid. (No offence, Stevie, but we all know you're no good with scissors..). On several pieces the seam allowance had been cut off, and they were also severed at all "lengthen-here" lines, so it was quite the puzzle.

I went for View 4, with short sleeves.

The construction was actually great. The back yoke piece is self faced, and made the inside lovely and clean. The instructions was clear and easy to follow, and the bow collar was so easy that the whole shirt was made up in just a few hours spread over a couple of days. None of that usual collar-crazyness!


I found the perfect buttons!! Can you see the little pussycats?
So cute!!


When it was time for sleeves, I decided  to use the same pattern pieces as I did on my first blouse.
There was not enough fabric for long sleeves, besides I really liked those little puffy ones with the pleating, but I wanted pointy cuffs this time.
To make a long story short, I went about fusing on interfacing, and cut the ends of the cuff pieces at an angle, only to find out that I was actually suppose to fold those pieces and so - they were ruined.
I was sure I could make new ones, and rummaged through my scraps. Oh no. Not a single piece big enough for even one of the cuffs, so it was time to get creative! I managed to cut out six narrow strips about 5" long, three of these were joined together and used as binding. I figured, since this was a bow blouse, some more bows couldn't hurt, right? So, ta-dah!! Bowed sleeves :)


I really like this blouse, but I think I need to put some darts in it, because it is HUGE! I have become accustom to 40s sizing, so a size 16 usually mean a 34" bust. This pattern, however, is from the late 70s, so the amount of ease is enormous! The fact that the bust size of 97cm (38+ inches), is printed on the envelope, totally escaped my attention... I blame my enthusiasm. Heh.
The color is really fresh, and to my recollection, I have never worn yellow before. So it was a positive, and cheery change in my wardrobe.

Pussy bow blouses are fun to wear, and I really want more of these. But i might look for a more fitted style next time. This one was great for getting my feet wet with these cute blouses. I would also like some in a more "dressy" fabric, but for my first go this everyday cotton was just the ticket!


The sewalong runs till the end of November, so there is still time to join, if you haven't already ;)

Saturday, 9 November 2013

I'm so excited!! No, make that ecstatic!!

If you thought that my last post about skiing outfits was totally out of the blue and coincidental, it wasn't!

You see, one week ago, Debi at My Happy Sewing Place posted about a special pattern sale at Retromonkey's shop on Etsy. The offer was 25% off to all her readers on gorgeous vintage patterns.

Needless to say, I scooted on over there and searched through all the lovely patterns Mary Beth is offering.
I had been looking for a good pattern for winter apparel for a really long time. I one time saw a pattern from 1935 on some website I now cannot remember. It was kind of a pattern Wiki and the pattern was "currently unavailable".

When surfin' Retromonkeys I spotted a pattern that nearly made me P my pants!!!


Oh yes! It was indeed the same incredible pattern I had seen!
The price was perhaps a bit more than what I usually spend when pattern shopping, but this was not just any pattern. Firstly, it is 78 years old and has made it through a war, and who knows what else. And secondly, it's still in factory folds. Thirdly, I got 25% off, and that helped a lot :)
And now, it will live in my ever growing pattern collection forever!

Mary Beth at Retromonkeys left me a lovely heartwarming handwritten Thank you-note along with the pattern. I love that! She is obviously a professional and caring seller, and I will definitely spend some more in her shop.


Now, I need to start searching for the perfect fabric. Woolen fabrics are notoriously expensive in Norway, but I managed to find a shop that seems to have good quality wools at reasonable rates. It's named Skaar tekstil AS, for you Norwegian readers that is perhaps also looking for wool ;) And if somebody know of other options on quality woolens, please drop me a note in the comments!

Have you ever struck gold on your pattern searches? Doesn't it feel awesome!??


Thursday, 7 November 2013

First flakes falling!

Finally, the first few flakes of snow are falling here in Norway-land.
Well, there are of course places further north in our small, but long country, that has gotten snow several weeks ago, but that will not stop me from doing all sorts of happy-dancing!! I looooove snow!!!


For the time being, it is not much, and temps are just around freezing point, so granted, this snow will not last, but it certainly is proof that winter IS coming!

We have a saying here in Norway, that all Norwegians are born wearing skis (that will explain my childless state). So I cannot contain myself, and have decided to celebrate winters arrival and future skiing prospects, with some lovely, snowy vintage inspiration! First off, fabulous mid-century art deco posters. Don't you just love these?


source


This gorgeous siren obviously loves her snow as much as me.  Look, she hears cherubs!!!
 I would too if I looked this fabulous when skiing!
(if you look closely, it's actually a little devil!)


source


Speaking of looking fab, check out these spiffy ensembles from winter 1937-38 Montgomery Wards! If you fancy an interesting read, why don't you check out the history of  womens sportswear as told by the Vintage Traveler, where this image was borrowed :)


source


Fabulous skiing ensembles from the 1930s.


source


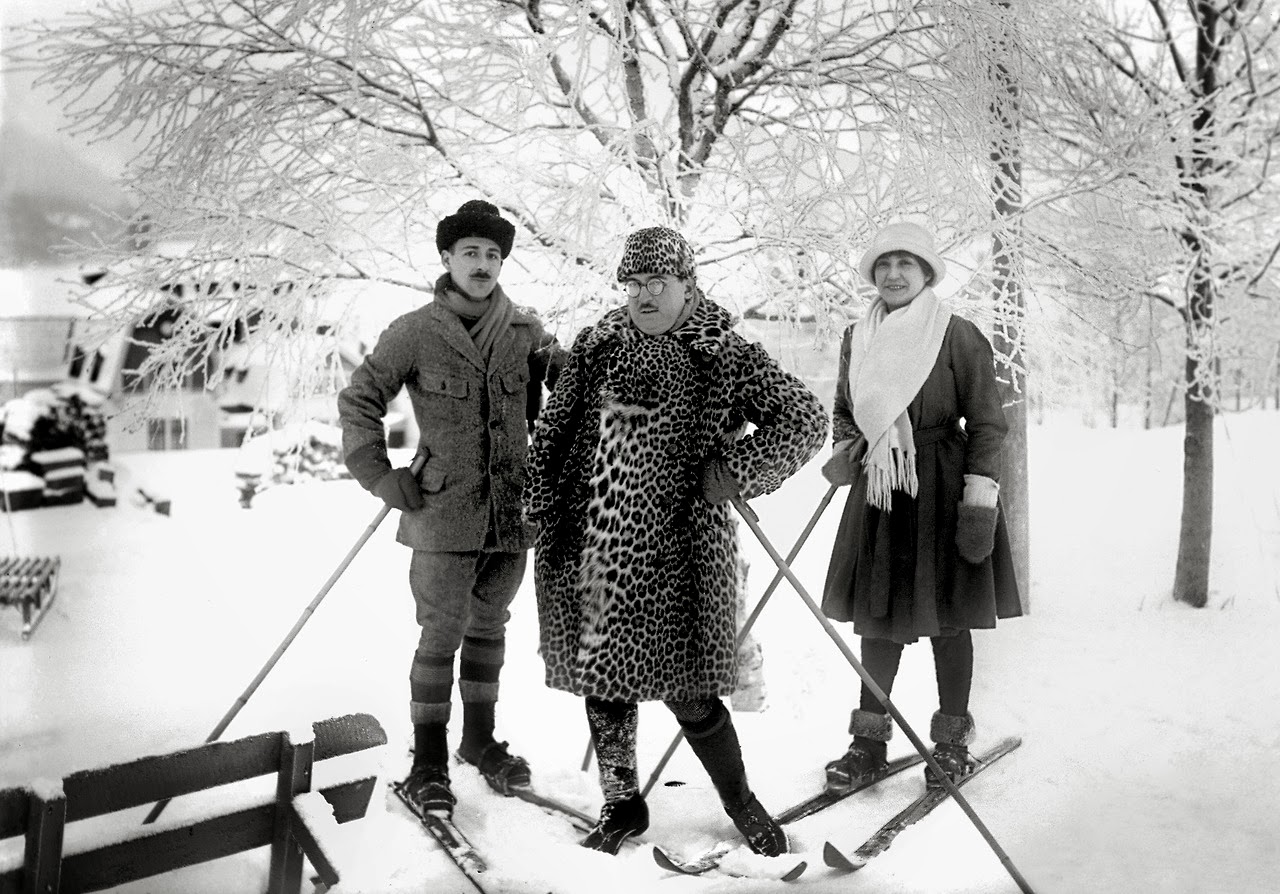
I wouldn't mind having my picture taken by this dapper French skier either, me thinks ;)
This is ski sport pioneer, early aviator and inventor, Étienne Banau-Varilla, at the 1936 Winter Olympics.
I think his outfit is outta this world..... Invent me a time machine, Étienne ;)


source


source


For those of you still on the fence about the awesome Knit for Victory challenge hosted by Tasha at By Gum By Golly, how 'bout a spectacular skier sweater? I think I need one of these!


source


I'll have this one! Gives me an excellent opportunity to wear my wood work goggles.....
Joking aside, this is a fantastic sweater.


source


No ski-related post written by a Norwegian, would ever be complete without making fun of our neighbors, the Swedes. They clearly have no idea. This gender confused gentleman is stomping on the other folks skis, wearing a dead animal. My bet is; he's not there to ski, but to make a pass at Charlie Chaplin on the left there, later on at the afterski.

source


Last inspiration pic doesn't have an ounce of snow in it, but who can resist Marilyn sand skiing in peep-toe sandals? Adorable...


So, how about you? Are you ready for winter yet? I say, bring it on!


Tuesday, 5 November 2013

Bow neck baby!

                                           Bow Neck Blouse Sewalong

I just wanted to share a great little sew-along I found recently over at Seamstress Erin.
It is scheduled for November, and the theme is bow neck blouse!
Follow the link to see how to participate :)

I love pussy bow blouses, and have a couple of patterns, but have never quite gotten around to make any.
So needless to say, I'M IN!

It would be a nice easy project of instant gratification, after all the struggles I had with the Little Horror dress.

So, are YOU in???  Come on, and join the fun!

Sunday, 3 November 2013

Little dress of horrors...

And so it is finally done! The 1947 McCall #7000..
So cute and innocent looking, but a devil in disguise I tell you.


The pattern, McCall #7000, 1947.


Behold!!
(insert cherubs singing)


This was initially going to be my entry for the Fall For Cotton challenge, due to be finished on September the 30th. But then my life got in the way, not to mention the dress giving me a proper run for my money.

This dress is full of "first's" for me. There are bound buttonholes, which actually turned out pretty good, with the help of lovely Laura Mae's tutorial at Lilacs and Lace. As a side note on the buttons; I know I was supposed to use shanked ones, but I just couldn't find ANY that looked remotely suitable. On any occasion, finding the right buttons for a project is my nemesis....


My first bound buttonholes :)
They ARE the same size, I swear......!

In a moment of insanity, I decided to fully line the thing. Also a first, and since the pattern didn't call for it, it meant I had to draft the lining pieces for the bodice myself, AND figure out the construction.

I did all mistakes imaginable in that very process, and the further along I got, the more frustrating it became. For instance, I sewed the lining to the armholes early on, so it was easier to handle as one piece. Only to find that finishing the armholes on the inside was not going to happen the way I wanted it. I ended up bias binding the seams, afraid that it would be very bulky, but it was actually fine!

I also sewed the bodice- and skirt lining to the waist seam when joining the two together, and so ran into trouble when it was time for the lapped side zipper.... Oh yeah, hadn't done any of those before either!


Creative inside lining.


The sleeves was also a major pain in the rear. First time around, I made sleeves according to the instructions, and constructed the cuffs before setting the sleeves. Apparently, baby corduroy stretches when being handled, and suddenly I had 4" of ease in the sleeve heads when they were ready to go on the bodice. There was just no way they would go smoothly into the armholes. So I had to make whole new sleeves.
I trimmed off about 1" of the sleeve heads for good measure, and finally got them onto the dress. Then I proceeded with the cuffs.

Have you ever seen so much ease in your life?

 The remake of the sleeves turned out a good thing actually, as I was able to use contrast fabric inside the cuffs, for a more interesting look.


Cute little cuffs :)


The zipper nearly stranded on the fact that I for some reason sewed the skirt together using less than 1/2" seam allowance. Don't ask why, I really have no idea. There was barely room to squeeze in the zipper on there, and I had to sew a strip of fabric onto the lapped side seam allowance. That gave me something to attach the zipper cord to, and in the end it was ok.....ish. My machine is not the best equipped when it comes to zipper feet, so it might have been less of a struggle if I had some proper feet. My lacking experience wasn't helping either.

On the positive note, the hemming went surprisingly well. I did an invisible hem by hand, and I am pleased with how it turned out. On the lining I lost my mind again obviously, and turned the hem to the wrong side, machine stitched it, got puckering and a general non-pro look. But at this point, I was just too fed up to even consider picking it, and re-doing. No. Way.


When I have put some distance between me and this creation, I am sure I will thank it for teaching me so much. My next lining attempts will be miles better, as will zippers, buttonholes, inside finishings, sleeve settings and fabric choices. I also learned alot about muslin fitting, so all in all, a gigantic learning experience!

I am really pleased not having this dress in a UFO pile somewhere.

I apologize for the oddly lit and sometimes blurry photos. Norway-land has really shitty weather these days, and has the light conditions of a cave. I plan to style myself when the sun comes out, to show you this beauty properly. It doesn't look like much on the hanger, but it's kind of rockin' "on-person" :)


Livingroom view, at noon.
Gloomy...

Saturday, 19 October 2013

Paging all nurses!

After a rather depressing weekend of UFO searching last week, I decided to admit myself into the Pinhouse FWYS-programme (Finish What You Start). Otherwise known as the Blogger Mental Hospital.  Meaning I had to wrestle myself into picking 1 -one- item from a UFO-pile, and not touch anything else craft related until said item was finished.

Reason? I am a notorious non-finisher. I tend to throw myself at new projects with great enthusiasm, get it almost done, and then distract myself with something new and totally lose interest in what I was working on. This just has to stop! It is not very satisfying having nothing to show for all the time I do spend crafting, not to mention those pesky UFO's mocking me from every closet of my house.

SO! Cheered on by my lovely "nurses" on the previous post (you know who you are!),
I am now proud to say: I FINISHED SOMETHING! (Thanks, ladies)

My smug-face :)


Ta-Dah!!!


This lovely knitted sweater is a project I started almost three years ago, and is from a Norwegian knitting book written by Tine Solheim, called "Maskeball". It was published in 2009, so not vintage, but the pattern is kind of retro with those traditional roses and the "fleas" all over. It is quite typical Norwegian, but with a twist, color wise.


The body is knit on the round, and the sleeves and collar knitted separately. The ribbing is made with a sort of cable technique, so it looks twisted. It is a lot more interesting than regular ribbing, but hellishly slow to knit!

Twisted ribbing. Sloooooow :P


I did struggle with setting in the sleeves, because of so much ease in the sleeve heads. But after some stitching and unpicking, I got a result I can live with. The sweater is rather fitted, so any wrinkle would be stretched out some, luckily.


My pressing technique needs attention :/


The neckline is a bit special, and I think if I were to knit this again (which I most likely won't) I would lengthen the back piece just a little so that the collar would lie better. It sort of pulls to the back a little. I would also close the "border edge" at the shoulder a couple of inches, it gapes rather oddly now. Another thing I might change is the location of where ribbing ends. When I started this sweater, I had yet to learn about the natural waist. I find now, that things that hit the natural waist, looks so much better than things hitting the "modern" waist. The ribbing wants to find my waist (good luck...), and rides up, creating excess sweater around the waist, which is less flattering.

The "a bit too long"-bit.


ANYWAYZZ! The whole idea with this exercise was to finish, and I am very relieved that I did. I felt really good to fasten the last thread, and folding a sweater (!) neatly together (instead of cramming a bunch of random pieces in a bag and hide them). It would be lying to claim I 100% enjoyed the process. It was hard to take it up again, I constantly laid it down and wandered towards the sewing machine. I tell you , that thing is like a drug, not to mention my fabric- and pattern stash.... But I was good.
All in all, I am happy with the sweater, and I think it is a nice usable piece for the upcoming winter!