Showing posts with label sewing. Show all posts

Friday, 29 July 2016

Rockabilly circle skirt dress - pt2

I've been hard at work on my new dress today. I really wanted to get a move on and get it finished for our holiday trip which is coming up in a few days.

As discussed in the previous post, I felt the bodice cups needed padding and some support, so I looked through my stash to see if I had anything that could be used. I found a pair of foam shoulder pads I bougth ages ago. They were not very thick, so could easily be remodelled into bra cups.


I made a small dart in each pad, and stitched them shut. To reduce bulk, I trimmed out some of the fold on the inside, and whip stitched everything flat.


 The pads now mirrored the bust shape in the bodice and was ready to be attached.


First, I tacked the point of the bust dart, to the point of the pad, so the pad would not shift around inside the bra cup. I shaped the bodice smoothly over the pads, pinned them loosely in place and carefully catch stitched the pads to the inside of the cups, making sure not to catch the outside fabric.


I love catch stitching, it looks so couture!


I am really happy with how the bust improved by doing this. I also realized that I will not be able to wear a bra with this dress, because of the low cut back. So integrated cups are gold! The dress looks, and feel, so much better.

I also put in some boning in the side seams. I used plain plastic boning, 1 cm wide. I just stitched it to the seam allowance using a three-step zig-zig, and handtacked it down to the underlining. This simple step will hopefully stop the bodice from sagging and folding at the sides, keeping a smooth shape.


Lastly, I got the skirt back sorted to take up the excess at the waist. I basically just opened up the back seam, trimmed off about an inch on both edges, and sewed the back seam together again. I decided to continue my "couture detailing" with a hand picked zipper. I haven't done those before, but it looks wonderful! Almost impossible to spot :)


The much improved bust,
properly period, bullet silhouette!


All remaining now, is stitching the bodice lining to the waist, and hemming!


Thursday, 28 July 2016

Rockabilly circle skirt dress - pt1

As I mentioned in my last post, I have a new sewing project going! One which really just partially involve a pattern, so it has been a bit daunting and exciting at the same time.

Ever since I made the striped beach outfit using the Mrs. Depew sun top pattern, I have had that top in my mind, because I always thought it would make an awesome dress bodice. Not long after the stripey sun top, I got hold of some fabric that was just screaming halterneck full skirt dress. But you know, winters came and dresses were not the priority (and to be honest, I was lacking skills), but I just couldn't forget about that dress.

Big bold florals!

Top pattern in question, Depew #1018.


So last week as I rummaged through the pattern stash, the sun top pattern emerged. Elvis hollered "It's now or never!!!" from the back of my mind, and I decided to just get on with it :)

The top obviously needed to be lenghtened a bit to reach my waist, but other than that I didn't do anything to it. I made a quick muslin with a zipper in the back to check the lenght, but I didn't attach a skirt to it. Nor did I bother with the bust trim. The top don't take much fabric and I had lots of the fashion fabric, so in the event of a small disaster I would be able to cut another.


The striped top is two layers of quilting cotton and is nice and sturdy. The dress fabric is very light, and it needed more structure, so I underlined it with cotton canvas. The bust trim is "party satin" (a midweigth fabric) and is backed with fusible interfacing. The bodice also has a layer of acetate lining next to the skin. I was debating on whether to put boning in, but I was so eagerly sewing, that it was kind of too late when the debating was over... Oh well. I can still get some boning done, at the back and sides. And you know what, I think I probably will. I also think the cups are too soft, and I really should put *something* into them, to "perk" them up a little (preferably boobs, but you know). Some foam would be swell, I just need to see what is available in the stash.


You can see the cup is slightly imploding. Miss Cardboard is obviously
lacking soft fleshy bits, but I feel the cups would benefit from some padding.


The upper edge of the cups caused me some struggles, as the interfaced trim bit across the bust is a double piece of satin with fusable. It is quite stiff and thick, and at the center front it got very bulky. I even had problems here with the cotton version. It's just so many layers that meet up in that seam. I graded and trimmed as much as I dared, and understitched the lining to the seam allowance and tacked it to the underlining layer all along the bust to keep it from flipping up. It's alright, but it took a lot of fiddling and pressing!

On to the skirt bit! I have never ever made a circle skirt of any kind, and was dreading the waist calculating. Since a great portion of the cut hole will be on the bias, it will stretch. Luckily, there is an online calculator for that, which I used. You basically plot in your waist size, and the calculator tells you the radius on your.. well, hole. My radius was apparently 12.5 cm.
My pattern piece ended up like so. I opted for a generous length as I had not yet settled on a specific skirt length. I made sure to include some for seam allowance on top, and also the hem. I think I want the skirt to at least cover my knees when standing.


My skirt is made up of three pieces, even though I could have cut two full half circles. The dress has a back zipper, so I figured I needed a back seam to set it in. I felt really brainy as I had it all figured out, with seam allowances for all three skirt pieces and everything! (Usually, those are the small details that just slip ones mind..) I underlined the skirt pieces too, but not with canvas, that would be too heavy. I had plenty of cotton batiste, which is light as kitten fluff, super smooth and just perfect for the job. It also made the colours pop on the white background.

With all six pieces cut for the skirt (minus the hole), I basted the doubles together, and sewed the three seams between the panels. I decided to just trust the calculator, and braved the scissors to the waist hole. Just as I finished the cut, it dawned on me that I hadn't deducted the seam allowance for the waist seam!!!!!!!!!!!! Oh no!

I was quick to sew a row of staystitching around the hole, because I was not having any more room in that waist, by letting it stretch even a tiny fraction! I have now basted the skirt to the dress, and I think I can do a little trick with the back seam in the skirt, to take care of that extra room in the waist.

When attaching the skirt, I also noticed that the side seams on the skirt and bodice don't line up. This didn't even cross my mind when planning the dress. I just assumed the side seam was at the side of the top, but it actually sits a bit to the front. And I made it worse when I lenghtened the bodice. So the skirt side seam now sits 1.5 inches to the back. I really don't mind too much, because the print is so busy. But if I were to make this dress again, I'd adjust the pattern pieces

I am actually glad it happened, because those are the things that you learn so much from :)


Ooopsie....! Fantastically non-matching seams :P

The dress is now hanging a day or two, to let the hem settle. Then I'll try to get it all sorted, with cup padding, maybe some boning, inserting a zipper, and then the hemming itself (good grief that's a long hem).

Wish me luck!


Thursday, 30 June 2016

Stashbusting linen project (pt.1)

When I dug out my Salme #113 playsuit pattern, I also found that I had bought another Salme pattern.
A rather nice top with a peplum and key hole cutouts front and back. I remember reading somewhere that peplums are flattering to the slightly uncurvy figure (of which I have plenty), and I suspect that's why I bought it in the first place.


I've made kind of a silent pledge to use patterns, and when possible, fabrics that are already in my stash. Just to keep costs down, and also keep the hoard down (and make room for new fabric, of course). I am happy to report that nothing new was purchased for this project, and it all started with the top.

I initially meant for this to be just a muslin of the Salme peplum top. I found two pieces of light blue linen in my stash that I bought out of a remnant bin. The weave is quite loose, and the fabric is a medium weight, but very soft. I really liked the colour, so if all turned out well, I could see myself wearing it. In some happy twist of events, I also found a piece of silvery grey acetate lining, and a plan started forming in my mind.

The top sewed up great. The instructions were very good, much better than for the playsuit luckily. But it was hard to check the top for fit during construction.  You need to sew the lining to the bodice early in the process, and you won't be able to really try it on until the zipper is in. And for that to happen, you need to attach the peplum piece too, as the zipper is in the side seam, and halfway down the peplum.
The top was a good fit over the shoulders and bust, but baggy below the bust. So, I had to take it apart again to make adjustments. The main issues were the bust darts (and the bodice length). I had fabric pooling on each side under the bust. I noticed that the dart needed to be taken in in the lower half only, so the excess would be taken up in the dart. It did wonders for the bagginess. I also took in a little bit more in the back darts, to tighten it up a bit.

This is the top before adjusting (sorry, bad phone pics)
On the front sides you can see that extra fabric pooling from the bust, and actually folding at the side seam.
In the back, the bodice is too long, causing wrinkles.


The fabric caused a bit of a problem, because it "grows" when handled and ironed too much. I made some wide legged trousers out of the same quality, and that has now got "knee-bags" in it. And a saggy butt. The top really needs lining, but during all the adjusting and unpicking, it had no support and it was hard not to stretch it. It would have benefited to be underlined, but I didn't want it to be too heavy. It was alright, as long as it was handled with care. (Top tip (and note to self!); when dealing with fabric that wants to warp and stretch, it helps to press, not iron.)

I noticed that with a peplum it is very important that the waist seam sits exactly at the natural waist, or the bodice will bunch up if it is too long. I attached my peplum twice before I found the sweet spot, and I also learnt that I'm rather short waisted! Fitting clothing is quite enlightening, and I think it is very interesting to see the huge differences small adjustments make.

Now, there is one thing I didn't like about the pattern, the peplum piece is not lined. This peplum is basically a very short full circle skirt, and we all know what it's like to hem a full circle. If the pieces were lined, you would have a clean finish on the (whole) inside, plus have the hemming sorted in one swoop. I didn't have enough lining fabric anyway, but If I make this top again the peplum will be lined.


I hemmed the peplum with bias binding,
and did the same for the skirt.


The cutout in the bodice is supposed to be closed by a stitch in the corner.
But I like it open, because you can flip down the tips, and have a collar of sorts.
We'll see what I end up doing


A little press and some minor finishing left!


When the top was all done, I still had a decent  piece of linen left. Was it enough for a skirt? Why, yes it was! The thought of a whole linen outfit was tantalising!

The pattern is part of  McCalls #7608 from the 1960s, a suit with a blouse. I decided to use the straight skirt, as it matched my waist size, so hopefully not too much redrafting. It also features a kick pleat in the back. (I also MUST make the jacket from this pattern, it looks great!)

Sadly, there was not enough of the silvery lining left, but I knew the skirt absolutely had to have support, so I went with underlining. You basically cut your skirt pieces in fashion fabric and another lining fabric, baste the edges together and treat them as one piece for the rest of the construction. The seam allowances need to be finished with this technique, and I went for binding them with bias strips of leftover acetate lining. The underlining is very fine cotton batiste, densely woven and ultra light.


When I stitched it up and tried it on it was very frumpy. Comfortable, yes, but oh so frumpy! I shaved off about one inch on both hips, and lightly pegged the skirt, so that it tapers in towards the hem. In all, I narrowed it 8" on the total width, so quite a lot!

There's only some handstitching to do on the skirt hem, and top lining. I also need to attach a hook and eye closure for the skirt and finish the zipper end. But other than that, I am just waiting for the sun to shine, so I can get pictures for the "big reveal"!


Tuesday, 28 June 2016

Butterick #5895 - Party pants!

The more I sew, the more I notice that I desperately need bottoms.
I went through my wardrobe recently, and sorted my trousers. Turns out, I have two pairs that can be classified as "out-of the-house" pants. And then there are the ones that are stricktly for home-alone use (indoors, definitely NOT beyond the garden borders), also two pairs. One of which is a 15 year old linen cargo thing. Just pathetic. And when I realized that my newest pair was bought in 2012, it is even more pathetic. I guess I don't have to tell you that I hate shopping for clothes?


Butterick 5895 


So I decided to make some effort to change this sad state of my trouser drawer.
I went through my pattern stash, and didn't find anything bifurcated, but then I remembered a pdf I bought on sale sometime last year, the Gertie capri and top, Butterick #5895. Great!

I did a quick search online to see if there was any bad rap, but not much turned up. Tasha from By Gum By Golly has done some intense work with this pattern here and here, and her last pair looked awesome! I was sold, and promtly printed out my pattern. If you are fitting pants, and having issues, Tashas posts linked above, are great, btw! Lots of tips and thoughts on fitting.

I went straight for size 14, and made it up with no alterations. I expected to muslin a great deal, so I just picked some unexciting grey polyester fabric from the stash and got to work. The pants sewed up in no time, all the pieces fit together beautifully and the instructions were clear, no nonsense. (After the Salme playsuit pocket ordeal, this was just pure sewing pleasure!)

As I expected, my first pair was on the small side, but they did zip up. The general shape wasn't all that bad, but needed some adjustments. The side seams were pulling to the back, telling me that the back pieces needed a bit more width up on top, towards the sides. There was excess fabric at the hips that needed to be pinched out, and the mid/lower thighs were too tight. There was some fabric pooling near the crotch, and also under the butt, I suspect because of the tight thighs.


Very tight in the waist and the mid-thigh.
The fabric is also aweful as it highlights every lump and bump...


It is a bit hard to see, but the side seam gets pulled backwards,
taking the pocket with it, causing creases.


I sized my pattern pieces up one size, and shaved off a little on the hip curve. I added some extra on the back pieces at the sides. I also lowered the front crotch curve, and tinkered with the back crotch curve, too.

The second pair was cut, this time I used some silver-striped black fabric I found in a remnant bin. It was super wide, and I suspect it's for upholstery. Just a crazy blend of cotton, viscose, polyester and lurex. The stripes were actually horisontal, but I decided to try using the weft as the grainline. I don't know how this effects the garment, so a working experiment! As the sewing went on, I was really loving these pants! They looked rather smashing, and after setting the zipper and trying them on I was really pleased! So much so that I had to quickly finish the insides where I still could, to make them a wearable muslin.


They even go with my red blouse!


I still think my pants could use some more work. They are a tad bit baggy around the crotch, but overall, they are comfortable, and fit quite nicely. I think I can pinch out a smidge more on the side seams at the hip, there seams to be a little excess there even when I'm sitting down.
I didn't think I would suit them, but I've worn them out already, and really like them. After wearing them a couple of times, the fabric has relaxed a bit and is not restrictive. The pants really goes with everything, too! And silver pinstripes? Yup, totally partyworthy :D

I've had my fears about sewing (fitted) pants, but this was such a nice experience. I love this style, the pants are easy to use with modern tops and tees, and of course the classic 50s style with a sleeveless tie top or a peasant style blouse.
I hope to continue to perfect these pants, and having more of them in my closet!
Oooo, maybe I'll make jeans now!!!!


Wednesday, 22 June 2016

Salme playsuit #113

Hiya!

I'm back with a new make, this time it's the 113 Playsuit by Salme patterns.
I bought this pattern a long time ago, after seeing some promising versions of it by other stitchers.
Playsuits/rompers haven't been my thing, but they seemed like perfect casual summer wear, and has had a bit of a revival this season. So I thought why not have a go?


I decided to make mine in a plain navy blue viscose, the same stuff my red blouse was made of. The quality is not stellar, but ok for day wear. Most importantly, it's comfy to wear.
I cut a size 10, which is a UK 12 and a EUR 40. The measurements given are a tad smaller than my actual measurements, but I've heard this pattern had plenty of ease so I was confident it would be ok.

I used the PDF version of this pattern, The pattern does not include seam allowances, and I hate that. I know this was pretty standard back in the day, and still is for some pattern companies, but still; I hate it.
The second thing I also didn't care for, was that the waist band was not included in the pattern pieces. So you need to draft that one yourself. In the instructions, lining fabric is listed in the notions, more specifically 28x35 cm. This will not cover your lining needs for the waistband, so not reliable as a shopping list. Also not included, was pattern pieces for belt loops. So there was a significant back and forth action, before all was in order. In the cutting diagram, the pocket pieces are not drawn in for some reason, so I had to rearrange my pieces to make everything fit.

Sewing up the playsuit, went swimmingly, up until the pockets. They are unnecassarily complicated, with their 4-piece construction, and the instructions aren't very good. By the time I had spent hours trying to get the first pocket right and also taking the bother to at least try and finish it to some standard, I totally dropped the ball on the second one and just stitched it like it said in the instructions (still not succeeding, btw). I don't like zig-zag-finishing, it looks untidy, and especially so on fray-prone viscose. If you are considering this pattern, and happen to have the Carolyn pajama-pattern from Closet Case Files, use those pockets instead (or some other normal pockets)!

The facings around the neck was also meant to be finished with a zig-zag edge, and was not interfaced. Far to unstable in my opinion. Needless to say, I slapped some fusable interfacing on there, and finished the edges neatly. All other seams I did the french way. I also finished the armholes with self bias binding.


This pattern is nice if you have sewing experience, and can plan for better finishing than stated in the instructions. If I had made this garment as a beginner, I fear the finished product would not look very tidy. But with additional interfacing and some decorative top stitching, it looks rather good.

After all is said and done, I think the playsuit itself is a good addition to the summer wardrobe, and I am very happy with it. It's easy to wear, and is a good style. I can't quite decide where I like the waist to sit, I left the elastic quite loose, so I can wear it low on the hips, but it might look better with the waistband drawn up nearer to the natural waist. In the end, I didn't use the belt loop pieces, but when photographing, I tried it with a belt. It suddenly looked more dressy, so I might stitch on some loops now. I am not that long in the torso, so I found the length in the back is good. It is always an issue when top and bottoms are joined, you do want to be able to bend forward without getting that dreaded wedgie!!


(Excuse the wrinkles. I sat down...)


The front is closed with snaps, so no visible buttons. During wear, the front gets pulled over to the side, exposing the snaps.  So even if it looks very clean without any visible closure, it doesn't quite work. I tried to pin it on the inside, but then you get pull-lines... If I make another, I'll just use buttons, or maybe small hooks and eyes right on the edge there.

I declare a sewing success, and feel my sew-jo is being rekindled!


Friday, 17 June 2016

"New" addition to Pinhouse (and a new blouse)!

Hello, stitchers!

I have exciting news :) I have finally got hold of a dress form (of sorts)!
I've been wanting one for as long as I've been sewing, but never found one that I liked the price tag of.
Then suddenly, an old beat up gal from the late 50s showed up, and I couldn't just leave her out in the cold. Yes, she is stained and a bit crumpled, and in desperate need a new stand and some TLC, but I think she is just lovely and charming!


The only story I have on her is that she used to belong to a seamstress working professionally.
The date 28.11.1959 is written on the dress form stand, so she is a mature lady of nearly 60. I cannot find a size on her, but she is stamped 4 in the neck. She is quite curvy, with a 39" severely pointed bust and a 26" waist, and the shoulders of an Olympic swimmer! She is made from some strange kind of lightweight material. If cardboard and felt had a lovechild, this would be it!


She matches my bust size, but I will have to pad out her trim waist, sadly (or start wearing a corset myself). She is somewhat adjustable, she is assembled with some kind of metal rivets, and there are punched holes at regular intervals on the waist and hips for different size settings. I've never seen this type of dress form, and found it quite interesting.


So what better way of introducing her, than to give her her first modelling assignment? (I've decided she will be my bad-hair-day-stand-in. Oh man, is she going to be busy!)


This is my latest version of the Style #3410 pattern I  first made last summer. Although I loved the finished blouse, it was too short in the body, and the polyester fabric was VERY static and clingy and drove me nuts. I wanted to make a new one with the long sleeves option and with some adjustments to the body for a better fit. I cut the pattern before Christmas, hoping to wear it over the holidays, hence the color. Obviously, that didn't happen but instead ended up in a bag. I finished it just in time for Constitution day 17th of May. The fabric is flowy viscose. A pain to cut, ok-ish to sew, but a pure joy to wear. (I do apologise for the photos, red is not easy on my camera, apparently.)


I think the curved seam on both front and back is a nice detail.


I am really happy with this one, but I am wondering if it would be even better with fish eye darts in the front. It is a bit boxy, but then again it is meant to be tucked in. The style is soft and feminine with the gathered details, and I love the longer, slightly "bishopy" sleeves. They reach just below the elbows, perfect for me, cause I'm always rolling up my sleeves without even noticing.

The plan is to sew a skirt to go with it. Skirts are hard for me, but it needs to be done. Do you have a favorite style of skirt or a favorite pattern?


Sunday, 12 June 2016

Feminine frippery!

Although this blog has been silent as a tomb lately, I have actually been making stuff.
I had a serious bout of tatting during most of May, after ordering heaps of lovely tatting thread in various colours and thicknesses.

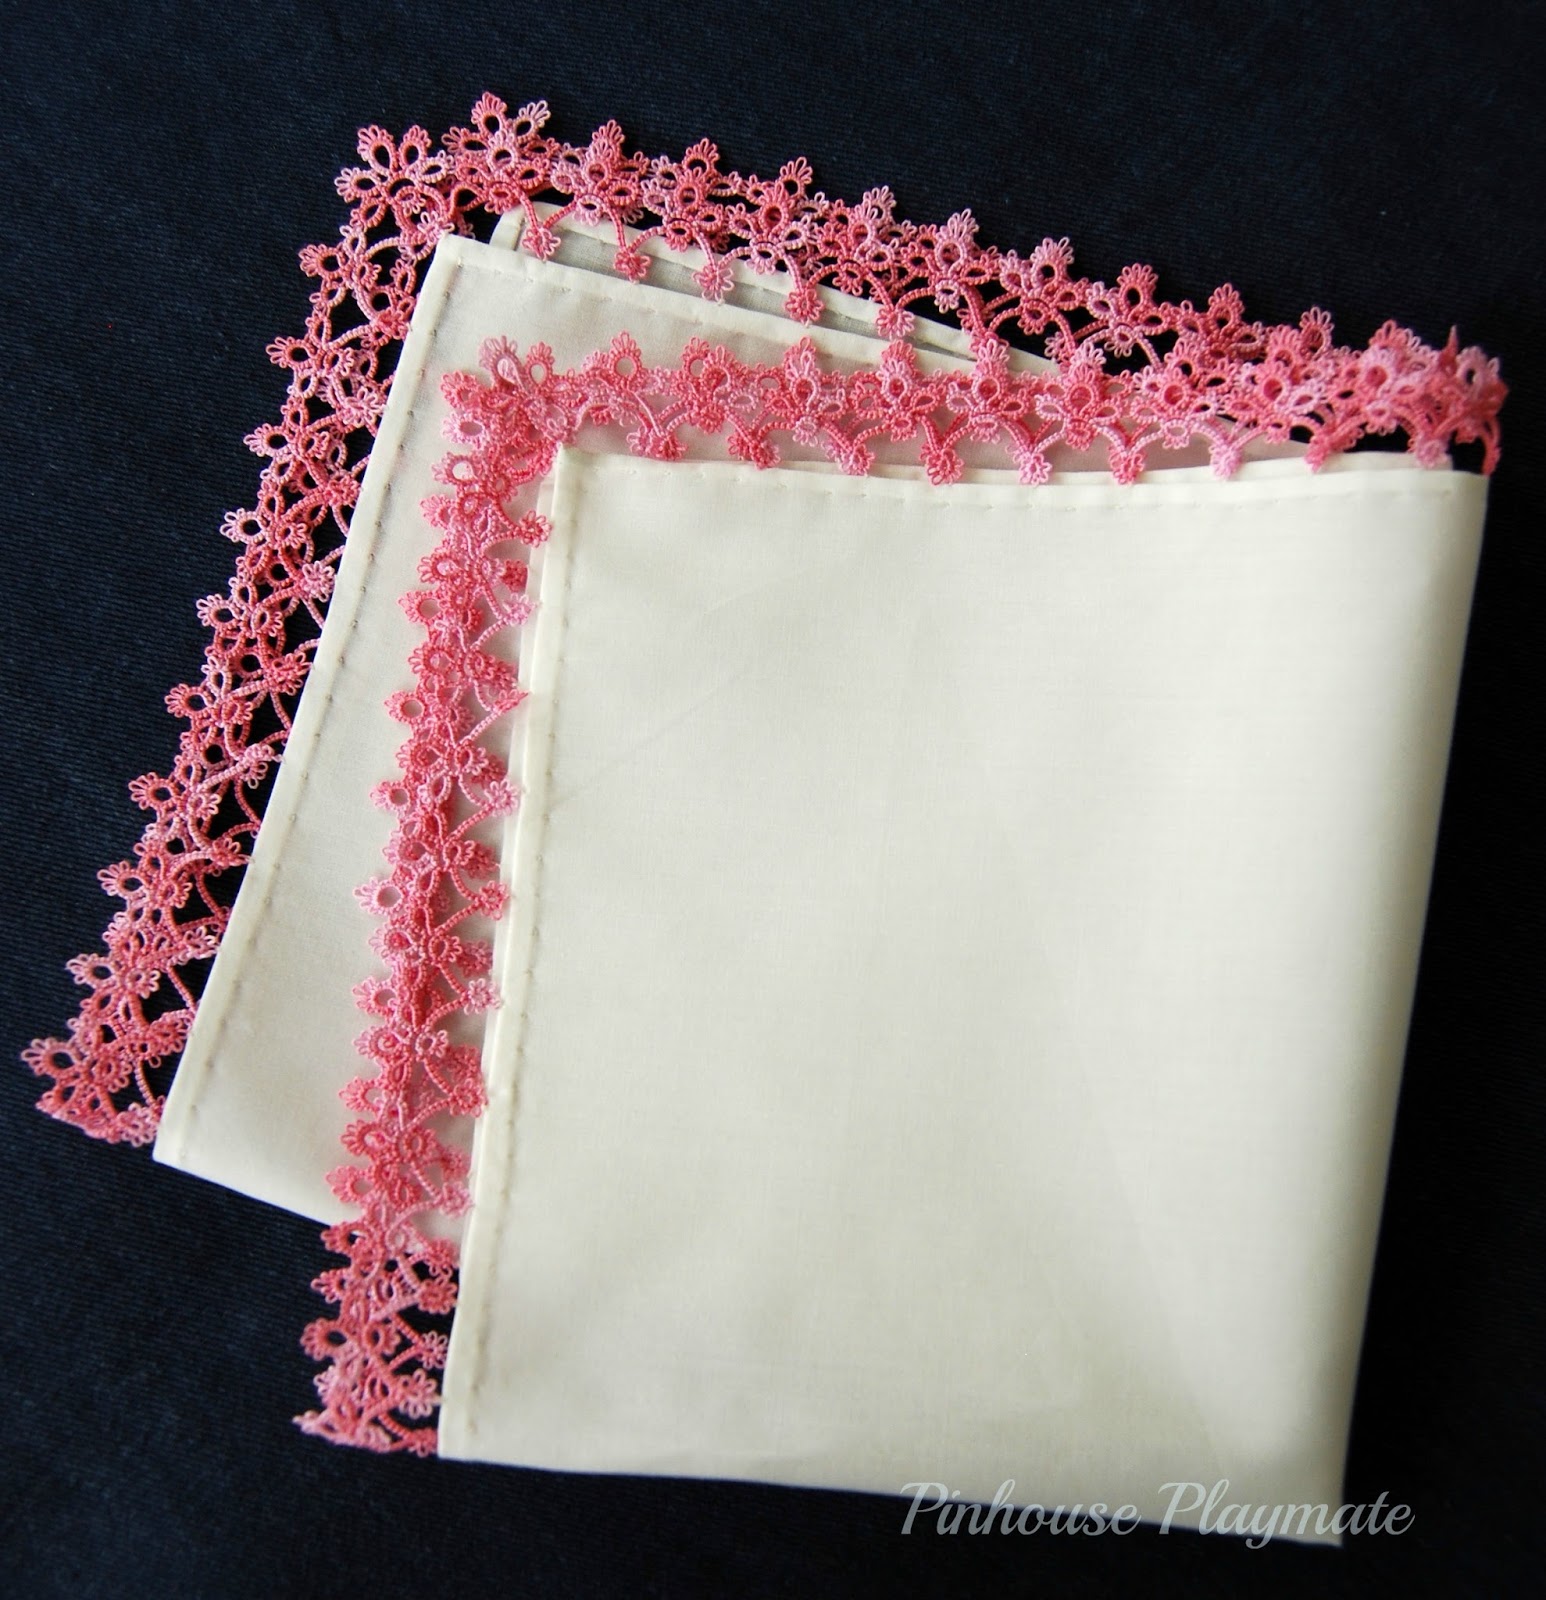
I really wanted to make some of those old fashioned handkerchiefs, with tatted lace edging, but wasn't really sure about what size of thread to use, and what size the handkerchief itself should be. I asked around online, and got answers from some nice ladies who owned antique ones. I wasn't even sure if the edging should be tatted directly onto the fabric. I opted for making the edging first, and then making a customised piece of fabric. That way, it is easier to get the corners to sit right.
The fabric is cotton batiste, densly woven, lovely and feathery light!
All edges are hemmed by hand.


Dainty little flowers, they look complex
but they were rather quick once you got going.


The thread most commonly used are size 80 to 100, which are very fine threads, and you get very dainty lace. It is also a pain to see in a poorly lit living room, and if you loose concentration, and make mistakes, they are harder to correct than thicker thread tatting. But the end result is stunningly beautiful!


Tatting has been around since the beginning of the 19th century, and it was very popular in the Victorian era. I would imagine every Victorian lady would have loads of these delicate embellishments on their undergarments, in their living rooms on small tables, tatted bookmarks and small beaded doilies over their milk jugs to keep flies off. And they surely had handkerchiefs!

This border pattern is free online, and is called "Iris". Designed by Joelle Paulson.
You can find it here, along with other lovely patterns on Le Blog De Frivole.

After making the edging, my shuttles were still half filled with thread, so I tried my hand once again on the Frauberger doily I made earlier. It is such fun to see the differece in size just by sizing down the thread!


The first Frauberger doily on the left measures 6.5".
The small one is only just over 3" across.
Stitch count is the same.


Have a lovely creative week!


Tuesday, 8 December 2015

All I want for Christmas is a...... plaid dress?

Ho ho ho, everyone!
Yes, it's drawing near now, isn't it?

When it finally dawned on me just how few weeks there are left until the holidays, I put my Victorian stuff aside for a bit. You have to make priorities, right?


You see, for the last couple of years, I've had grand plans of a plaid Christmas dress of some sort. But every year has been the same; so many plans, so VERY little time! Since becoming unemployed, that is not the case this year, and I will  finally (hopefully) have a me-made dress for Christmas! Yay :)
I opted for a dress not too dressy, just classic lines and a bit of grown-up appeal.

When choosing the pattern, I wanted one that had something new. I have never made anything with plaids before, so you would think that should be enough novelty for one project... But noooo.
Princess seamed dress for the win!


This is Maudella #5204, in a 35"bust.
I cannot find a year on it, but it's probably mid-sixties.


I think princess seams was why I initially bought this pattern in the first place, because the cover art design is not something that awakens my desire, if you catch my drift. Man, those ladies have properly sloping shoulders!! Luckily, the pattern inside was not made for nearly as extreme anatomical features, and my first muslin fit me beautifully with no alterations other than adding a smidge in centre front and back panel. I didn't take any photos before I took apart the pieces, to use as pattern for my fashion fabric.

Now, on to the cutting. I tried to be a brain-monster and get it all right, but you know how when you really concentrate on something, another detail that is usually a no-brainer goes wrong? Right.
So I managed to match the horisontal lines, but as I discovered when assembling the six main pieces, the two front sides, and the two back side pieces did not quite mirror each other. It is not anything glaringly obvious, but it is kind of annoying. I have extra fabric left, but I am still debating whether I'll make the jacket to match. I'll take some measurements of the faulty side piece, and if I can use it for the jacket, I might re-do. Otherwise, it is just a big waste of fabric for such a cosmetic flaw. So I am trying to live with it for now :)


Doh-moment!


I am sorry for this rubbish phone-photos, but you get the general idea. This is the back half of the dress on my ironing board, and as you can see, those two sides are not "on target". The front is better,

My plaid is a lovely wool blend fabric, that is nice and light. I will obviously need to line it because of the itch-factor, but I think I'll be fine on that one. My plan is to just make up a second dress in lining fabric and drop it inside. How hard can it be, right?

It's panning out to be a fun project with lots of new things to learn, and hopefully I'll have a finished dress to show you shortly! In the meanwhile, I wish you lots of success on your Christmas preparations ;)

Toodles!


Thursday, 3 December 2015

Making a lobster tail tournure (pt.1)

Hello!

Next step in my Victorian outfit is the bustle support that goes under all your skirts, to make the famous big victorian butt! Back in the day, these came in lots of different varieties and a lady probably had more than one, to suit her different dressing needs.


source

From the V&A museum.

source
source


I decided to make mine without a pattern. If you think about it, it is just a simple half-dome shape that needs to be collapsible (lengthwise) for when you sit down. And with all the excellent photos around of extant garments, it shouldn't be too hard to figure out.

I also did look for tutorials online, and remembered seeing one at the American Duchess blog. I used that as my starting point. To make the back panel that holds the boning channels and gives the whole thing it's shape, I started with a piece of fabric 30x32 inches, that were folded in half along the shorter side. I drew on the curve for center back, cut off the excess, and made a french seam along this now curved edge and all the way down.

Pardon the wrinkling, this is actually on the inside
of the thing. Mid construction.


Next was marking the boning channels. Now, I made my bustle using just a single layer of fabric, so making channels would require a way to encase the boning. I didn't want two layers of fabric for the whole thing, as the muslin I used would get very heavy if doubled. There is finished boning tape on the market, but since I now find myself on a budget, I had to think of something else.


In hindsight, I don't know how smart this was, but I decided to make ruffles! They certainly add volume, but I am not sure how they will behave under petticoats. I only hope they don't get all lumpy. If it all fails, I've learned a valuable lesson, and it is quick to make a new, unruffled one. Also, when thinking about it, the bustle is probably heavier now, with ruffles, compared with using  two layers in the back panel.... Doh!
Oh well, if anything, it looks cute...

So I marked the boning channels on my back panel first. By the way, I suspect the drawing on the AD page to have an error. If you look at how the channels are placed on the sideview drawing, the ends of the two top ones are further apart at the sides. In my head this does not make sense. They need to be closer together, to form a rounded dome shape. (Other than that small niggle, the tutorial is fantastic!) So at this point, I put aside the tutorial, and went with my instincts.

I sewed the gathered ruffles ontop of the marked lines, and then did a second seam (7mm) under it to form a boning channel. The ruffles are placed so that they cover the top of the next one. The sides of the top two are tapered towards the sides, because the channels are closer here. I found it looked better like this.

Top ruffles are tapered at the sides, so wider/longer at the centre.


 For boning I went to the hardware store and got a drain cleaner! These are better value for money than corset boning, and I didn't have to order it from the UK. It came in a 7.5m coil, which I then cut into the lengths I needed. I filed the edges round, and applied 5 coats of nailpolish to every end. I left them to completely dry for a couple of days. These steps are important, so the boning doesn't cut its way through your fabric.


If you ever decide to try drain cleaner spring steel, get a decent quality. I first bought a very cheap one, that I could bend with my fingers. Obviously, this would not hold up to wear and would quickly get dented and loose it's shape if I were to sit on it. Get steel that spring back to it's shape when bent and released. Most does this, but just be aware.

I decided to just bone the top half, so only four bones. I don't think it is necessary to bone it all the way down, but I might be wrong. I also wonder if it needs to be this long, but I'll leave it for now.
One of my bones ended up slightly too long, so this is how far I have come with my bustle. Just waiting for the nailpolish to dry on the new bone now :)  Next is attaching the tie strings on the inside, and then the side panels and waistband.